Getting Started with GroceryBudget: Your First Shopping Trip in 5 Minutes
A step-by-step walkthrough of GroceryBudget — from your first cart to tracking spending over time. No account required to start.
Key Takeaways
• No account needed — open the app, create a cart, and start tracking on your very first grocery run.
• Price memory kicks in after one trip, so your regular items auto-fill their prices — setup gets faster every week.
• Check off items while you shop and the budget bar updates in real time, so you know where you stand before reaching the register.
Ever finish a grocery run and wonder where all the money went? You had a rough number in your head, but the receipt tells a different story.
GroceryBudget fixes that. It tracks what you spend by cart, item, and store — so you always know where your grocery money goes.
This guide walks you through everything from creating your first cart to reviewing your spending trends. It takes about five minutes to get going.
Start Using the App Immediately
No signup required. When you open GroceryBudget for the first time, you're a guest user with access to every feature — carts, budgets, insights, all of it.
When you're ready to create an account, all your data (carts, items, price history) transfers automatically. Nothing gets lost.
Why this matters: You can try the full app on your next grocery run before deciding to commit.
Create Your First Cart
Tap the + button on the main screen to create a cart.
You only need one thing: a name. Everything else is optional.
- Store — Select a store if you want price memory to kick in (more on that below). A "Local" store comes prebuilt, and you can add your own stores anytime.
- Budget — Set a spending limit to get real-time tracking while you shop
If you skip the name, the app generates one for you. You can always edit the cart details later.
Tip: Head to Account > Manage Stores to add the stores you shop at most. Tap the star on a store to set it as your default — it will be pre-selected every time you create a new cart. One less thing to tap.
Add Items to Your Cart
The app comes with a built-in library of common grocery items. Start typing in the search field and it suggests matches — each with a category already assigned. "Milk" maps to Dairy, "chicken" maps to Meat, and so on. Items the app doesn't recognize get filed under "Other," and you can always change the category.
A few things that save time:
- Smart Add — Tap the mic to dictate ("2 lbs chicken breast $4.99") or use your camera to scan a product label. Smart Add parses the name, quantity, unit, and price automatically. Voice runs on-device and works offline; camera scanning uses AI on a server, so it needs a connection.
- Price memory — If you've bought this item at this store before, the app suggests your last price. No retyping.
- No duplicates — Adding an item that's already in your cart increases the quantity instead of creating a second entry.
- Quantity controls — Use the + and - buttons to adjust amounts.
You can manage your categories in the Account tab — rename them, add new ones, or reorganize however you like.
A note on your first trip: Adding items and entering prices for the first time takes a bit of effort. That's normal. But here's the thing — you only do it once. After your first trip, price memory kicks in and suggests prices automatically. Save your cart as a template or duplicate it, and your next trip takes seconds to set up. The app gets faster every time you use it.
Shop With Real-Time Budget Tracking
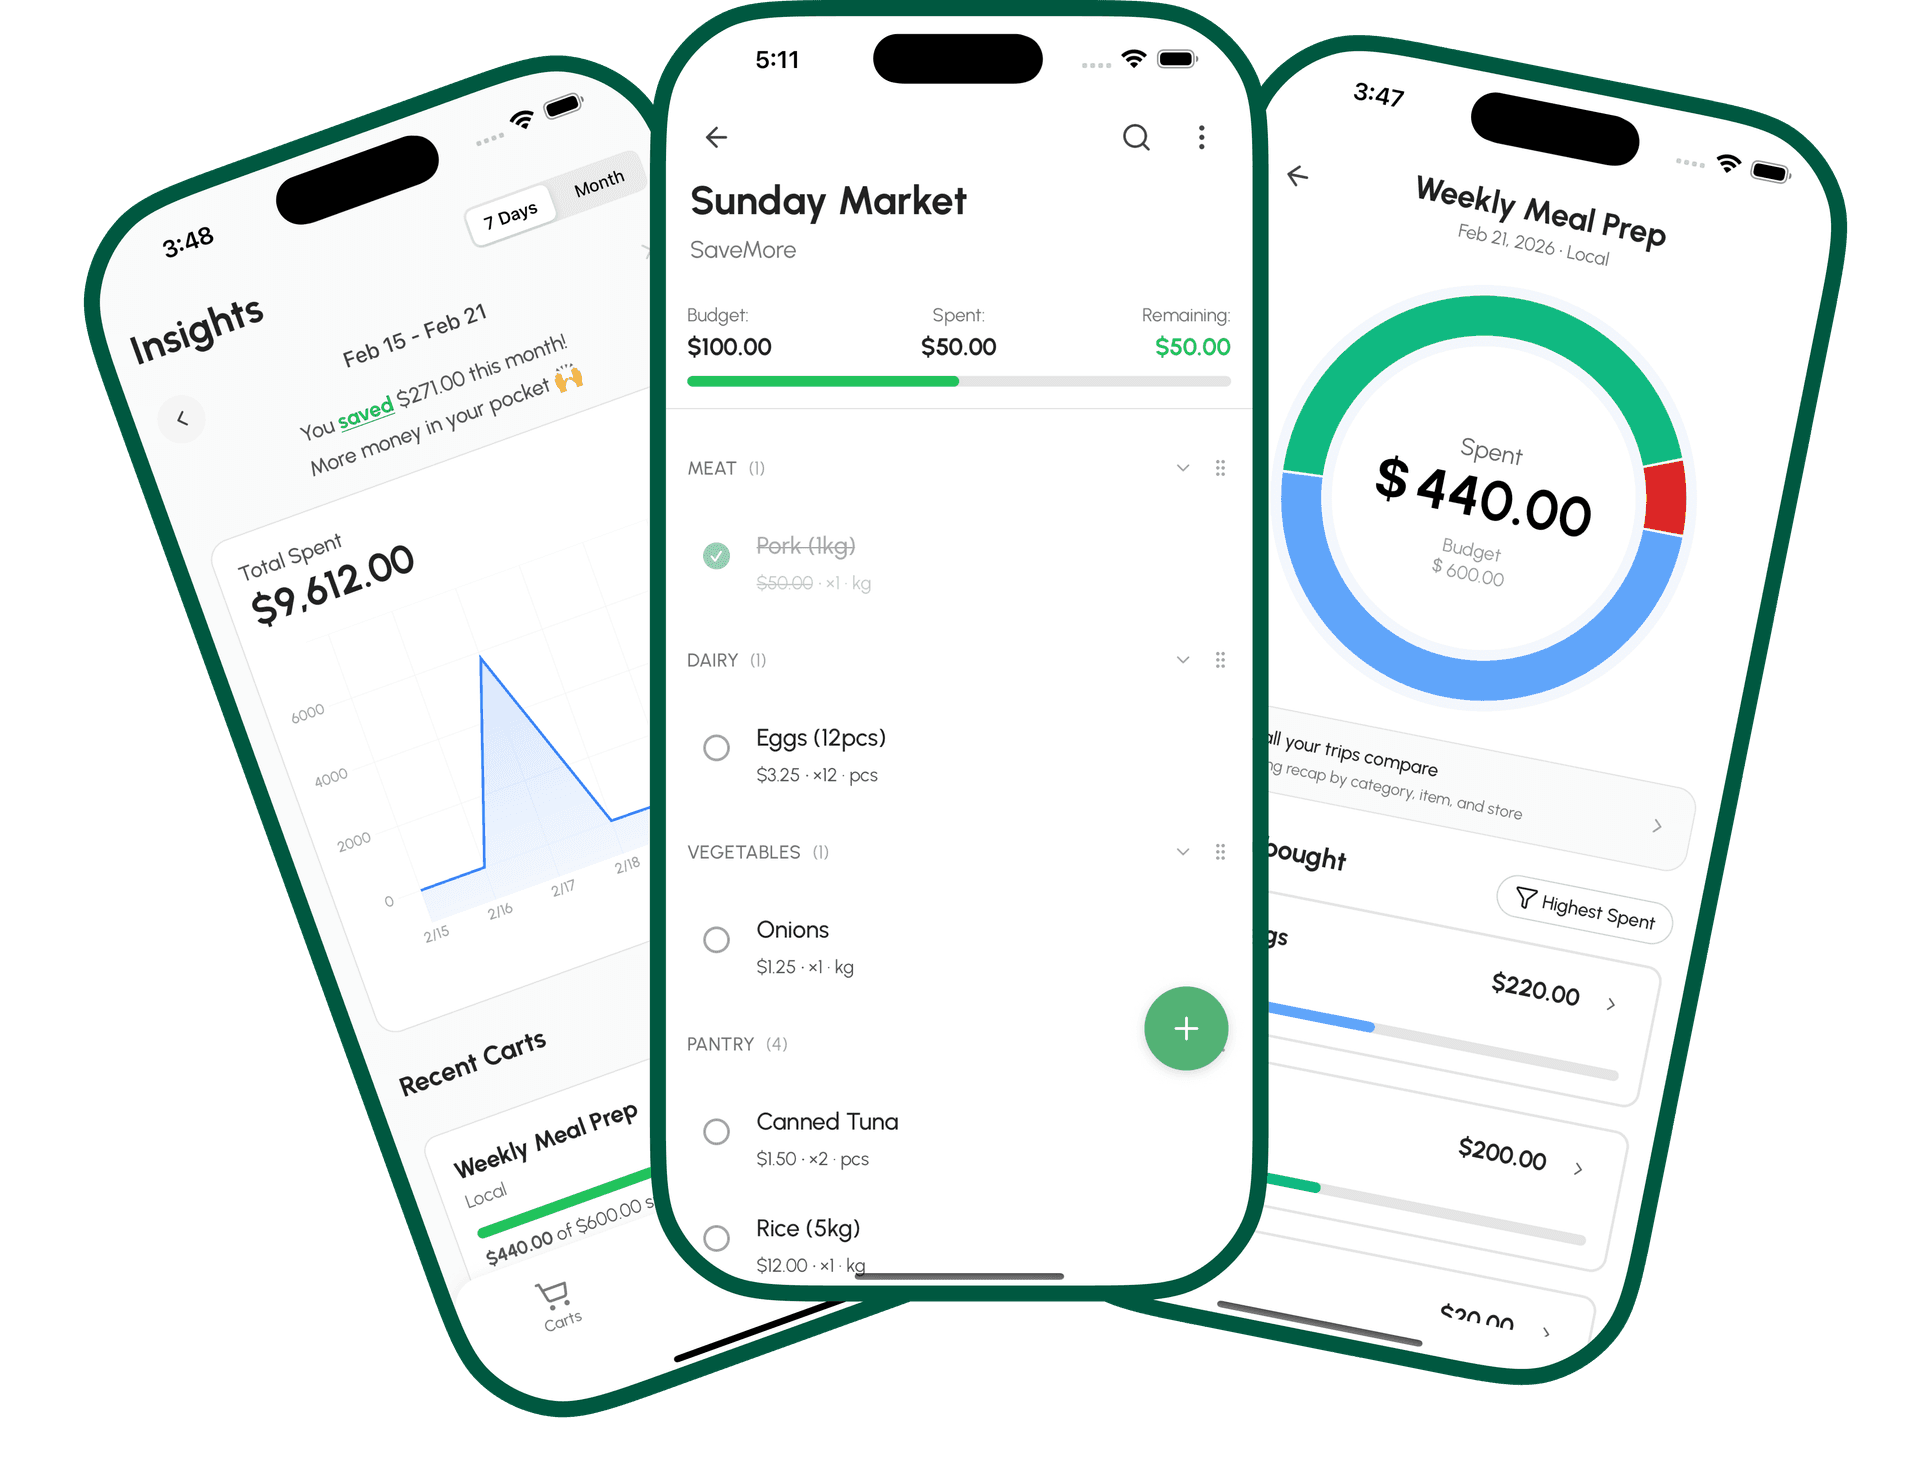
This is where GroceryBudget earns its name. As you check off items during your trip, the app tracks your spending in real time against your budget.
- Progress bar shows how much of your budget you've used
- Warnings appear when you're approaching your limit
- Alerts fire when you go over budget
Check off each item as it goes in the cart. Only checked items count toward your total — so if you skip something, it won't affect your budget.
Everything works offline. No Wi-Fi in the store? No problem. Your data syncs automatically when you reconnect.
Complete Your Trip
When you're done shopping, tap Complete Trip.
If you have unchecked items, the app asks you to confirm — only checked items count toward your final spending total. Unchecked items are kept in the cart history so you can see what was skipped.
After completing, you'll see a summary of what you spent. The cart moves to your Insights tab where it becomes part of your spending history.
Changed your mind? You can move a completed cart back to active from the Insights tab. You can also save any cart as a template to reuse next time.
Track Your Spending in Insights
The Insights tab is where your shopping data becomes useful over time.
On the main screen:
- Spending trend chart showing your grocery costs over time
- Total spent with savings tracking (how much you stayed under budget)
- A sortable list of all your completed carts
Tap "See recap" for deeper breakdowns:
- Categories — See how much goes to produce vs. meat vs. pantry staples
- Items — Find your most-purchased items and biggest spending categories
- Stores — Compare spending across different stores
Each completed cart has its own detail view with a category donut chart showing where the money went on that specific trip.
Switch between 7-day and monthly views using the toggle at the top, and navigate between time periods with the arrow controls.
Reuse Your Carts
After a few trips, you'll never want to build a cart from scratch again. GroceryBudget gives you three ways to reuse past work:
Duplicate Cart — On the My Carts screen, long-press any active cart and select "Duplicate." The app creates a new cart with the same items, store, and budget — quantities reset to 1 and everything unchecked, ready for a fresh trip.
Use Again — Same idea, but for completed carts. In the Insights tab, tap the menu on any past cart and select "Use Again." It creates a new active cart from your shopping history.
Templates — Save any cart as a reusable template. Templates are ideal for weekly staples or recurring shopping lists. Load one when creating a new cart and your items are already filled in. Creating, editing, deleting, and duplicating custom templates is free and unlimited for everyone. With Premium you can also set any cart to repeat automatically every week (or every 2–4 weeks), so your list rebuilds itself.
Between price memory, templates, and cart duplication, your next trip is already faster than your first — and it only gets quicker from there.
Export Your Data
Want your shopping data in a spreadsheet? Tap the menu on any completed cart in Insights and select Export CSV. This is free for all users.
Use it to track spending trends in Excel, share your grocery budget with a partner, or keep a backup outside the app.
Get More With Premium
GroceryBudget's core features are free with no time limit. Premium adds deeper analytics and faster input for serious budgeters:
- Unlimited AI label scanning — Point your camera at any shelf label. AI reads the item name, price, unit, and category instantly. Free users get 3 free scans to try it; Premium removes the limit.
- Unlimited AI receipt scanning — Already shopped? Snap your receipt and AI logs the whole trip: items, prices, store, and date. 3 free scans included; unlimited with Premium.
- Recurring lists — Set any cart to rebuild itself every week (or every 2–4 weeks) from a template.
- Unlimited insights history — Free users see the last 7 days. Premium unlocks your full spending history.
- Full most-purchased items list — Free users see the top 3. Premium shows everything.
- Family Sharing — Share your subscription with up to 5 family members.
Premium is available monthly ($3.99/mo), yearly ($19.99/yr), or as a lifetime purchase ($39.99). Prices vary by region and are shown in the app. It works for guest accounts too — no need to register first.
What to Do Next
You now know everything you need to run your first trip with GroceryBudget. Here's a quick recap:
- Open the app — no signup needed
- Create a cart with a name, store, and budget
- Add your items and let price memory do the work
- Shop and check off items while tracking your budget
- Complete your trip and review your spending
- Check Insights to see where your money goes over time
- Save a template so next week's trip takes 30 seconds to set up
The more you use it, the smarter it gets — price memory builds up, spending patterns emerge in your insights, and templates make repeat trips effortless.
Ready to start? Download GroceryBudget and create your first cart.